
The essentials at a glance
- Mango wood naturally varies in tone, so colour differences between pieces are normal, not a defect.
- Oil and wax keep a softer, more tactile look, while lacquer gives the strongest everyday barrier.
- Direct sun, radiators, and standing moisture are the fastest ways to dull or damage the surface.
- Soft cloths, coasters, and quick spill cleanup do most of the real protective work.
- If the surface looks tired, a compatible refresh is usually better than aggressive sanding.
What a mango wood finish really does to the surface
When I look at a piece of mango furniture, I treat the finish as the layer that decides how the wood presents itself, not just how protected it is. It controls sheen, deepens or softens colour, and can make the grain feel either open and organic or more sealed and formal. On mango wood, that matters because the timber already has a lot going on: natural variation, movement in the grain, and a texture that benefits from careful sanding rather than heavy-handed coating.
That is why two sideboards made from the same species can feel completely different in a room. One may read as pale and airy, another as rich and dramatic, simply because the surface treatment changes how much light the wood reflects and how much of the grain stays visible. That visual range starts with the timber itself, which is why I always look at the colour and figure underneath before I think about the coating.
The next question is how much of that natural character you want to preserve, because the answer shapes every finish choice that follows.
Why the grain and colour look different from piece to piece
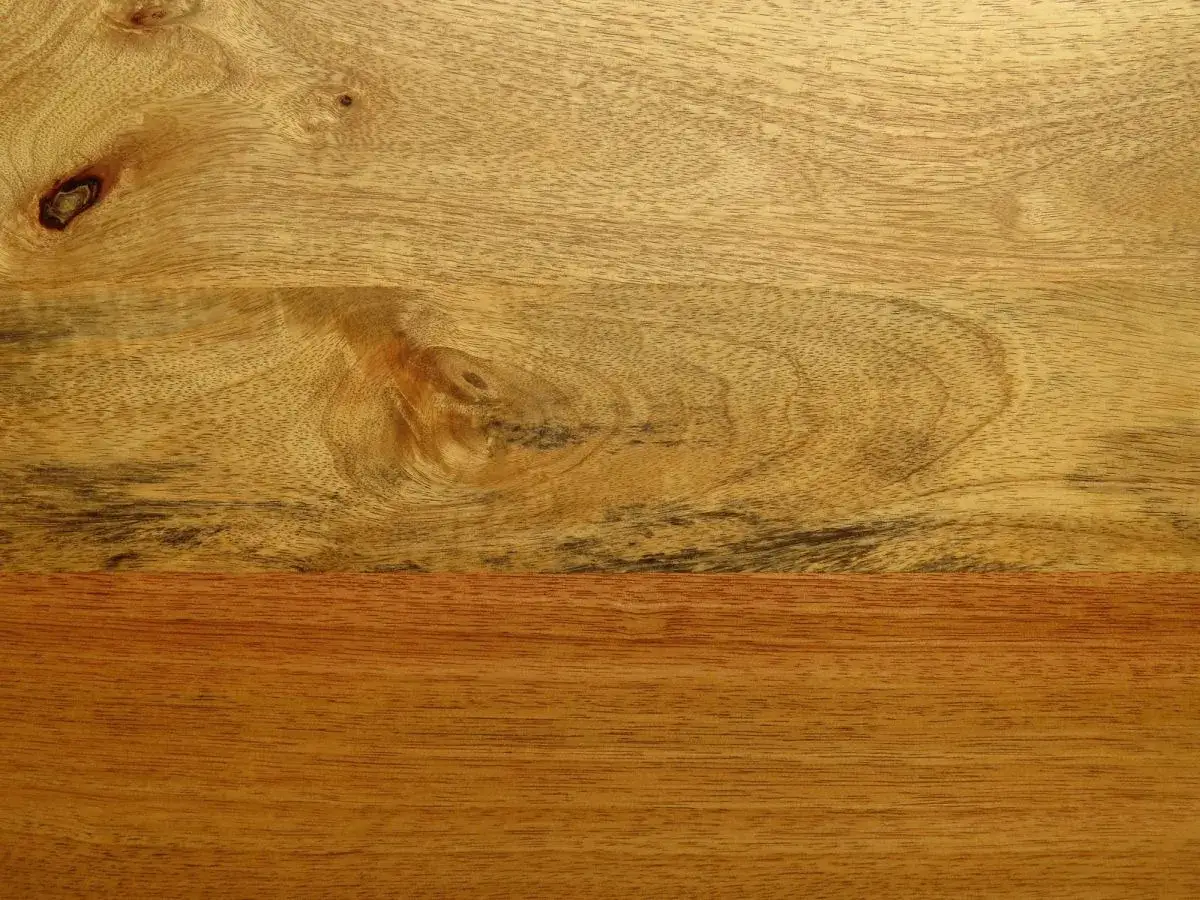
Mango wood is known for colour variation, and in practice that usually means warm golden brown tones with yellow, pink, or darker streaks running through the surface. Some boards are calm and even; others show mottled or curly grain, and spalted sections can add a more dramatic, almost painterly look. I would treat those marks as character, not defects, unless the colour change comes from poor drying, staining, or water damage.
This variability is one reason mango wood suits design-led interiors so well. It does not try to look uniform, which means a good finish should work with the grain rather than bury it. A clear or lightly tinted surface usually keeps the wood believable and alive, while a heavy stain can make it look flatter than it needs to be.
Once you know the timber is naturally variable, the next question is which surface treatment will amplify or calm that look.
Common finishes and how they behave
In most homes, the decision comes down to four practical routes: oil, wax, lacquer, or a tinted stain followed by a protective coat. Each one changes the look, the feel, and the upkeep in a different way. I would not choose purely on appearance; I would choose by use, room conditions, and how much maintenance you are willing to accept.
| Finish | Look | Protection | Upkeep | Best for |
|---|---|---|---|---|
| Oil or hardwax oil | Natural, warm, slightly matte to soft satin | Good, but not fully sealed | Needs periodic refresh and careful cleaning | Dining pieces, sideboards, and furniture where you want visible grain |
| Wax | Soft sheen, tactile and traditional | Moderate, more vulnerable to spills | Regular re-waxing, especially on high-use tops | Decorative furniture and lower-traffic surfaces |
| Lacquer | Smoother and more sealed, often with a clearer sheen | Strong everyday resistance | Easier daily cleaning, but harder to spot-repair | Busy dining areas, family homes, and spill-prone rooms |
| Stain plus topcoat | More colour control, less natural variation | Depends on the topcoat | Varies with the coating system | When you need to shift the tone to suit existing furniture |
| Raw or barely sealed | Very natural, but visually fragile | Low | High maintenance and not ideal for everyday use | Display pieces or controlled environments |
For me, oil is the most honest choice when you want the grain to stay alive. Wax is warmer and more forgiving visually, lacquer is tougher, and stain is really about colour control rather than protection. From a sustainability point of view, the more repairable the finish, the easier it is to keep the piece in use for longer instead of replacing it too soon.
That leads naturally to the next decision: which finish actually suits the room where the furniture will live.
How I would choose a finish for each room
Dining tables and kitchen-adjacent pieces
If a mango wood table will take spills, hot plates, and daily wiping, I would lean toward lacquer or a hardwax oil. The goal is not to create an indestructible shell, because wood still moves, but to buy yourself more breathing room when life gets busy. A dining top also needs coasters and mats regardless of the finish, because no coating loves prolonged heat or standing moisture.
Sideboards and bedroom furniture
For a dresser, cabinet, or bedside piece, I am more comfortable with oil or wax. These finishes let the wood feel warmer and more tactile, and they suit furniture that is handled often but not abused. This is where mango wood’s colour shifts can look especially good, because the finish can leave the figure visible without making the piece feel overly polished.
Read Also: Solid Wood vs Manufactured Wood - Which Is Best for Your Home?
Bathrooms and high-humidity spaces
I am cautious here. Mango wood can work in a bathroom if the room is well ventilated and the surface is properly sealed, but it is not my first pick for splash-heavy areas. In a humid room, a stronger finish and good airflow matter more than clever styling. If the piece will sit near steam or repeated condensation, choose the most protective option available and keep expectations realistic.
Once the finish is matched to the room, the daily care becomes much simpler and much more effective.
How to clean and maintain it without stripping the finish
The basic routine is straightforward, and honestly it does most of the work. Dust with a dry, soft cloth. If you need to remove fingerprints or light marks, use a cloth that is only very slightly damp, then dry the surface immediately. Harsh chemicals, abrasive pads, and rough fabrics are the quickest way to ruin the look of a good surface.
I also keep furniture away from direct sunlight and radiators whenever possible. Heat and light do not just dry the wood out; they can also fade the richer tones and make the finish look tired before its time. That matters especially in UK homes where a dining table can sit near a bay window or a sideboard can end up next to a warm wall during winter.
For waxed surfaces, maintenance is more hands-on. A lightly used cabinet may only need attention about once a month, while a daily-use table can need re-waxing roughly twice a month. That timing is not fixed, because room humidity and wear level both matter, but it gives a realistic starting point. The more you use the piece, the more often the surface needs replenishing.
If the wood already feels dry, patchy, or dull, maintenance may no longer be enough, which is where repair comes in.
When a tired finish needs repair or refinishing
The first thing I do is identify the finish before I touch anything else. Wax feels softer and more open, oil soaks in rather than sitting like a shell, and lacquer usually looks more sealed and can chip rather than simply fade. If you guess wrong, you can make a small problem larger.
- Clean the surface first and let it dry fully.
- Check whether the dullness is only on the top layer or whether the wood itself has been marked.
- For waxed or oiled surfaces, apply a compatible refresher thinly and buff with the grain.
- For scratches, sand as lightly as possible and stop as soon as the mark lifts.
- For lacquer damage that is widespread, plan for a fuller refinish rather than a tiny patch job.
I am especially careful with sanding on mango wood, because interlocked grain can tear out if you get aggressive. A conservative approach usually gives a better result: start fine, test a small hidden area, and only increase abrasion if the damage genuinely needs it. That restraint matters more than speed.
The last piece of the puzzle is avoiding the small habits that quietly shorten the life of the surface.
Mistakes that shorten the life of the surface
- Using all-purpose spray cleaners with harsh solvents, which can dull or soften the finish.
- Leaving spills to sit, especially on waxed or oiled tops where liquid can work into the grain.
- Scrubbing with scouring pads, which scratches the coating and makes the wood look tired.
- Placing furniture in direct sun or beside a radiator, which speeds up fading and dryness.
- Refinishing over dust or residue, which traps imperfections under the new coat.
- Over-sanding, which removes more of the original surface than you intended and can flatten the character of the grain.
A finish does not fail all at once; it usually wears out through repeated small mistakes. If you avoid those habits, the wood can age gracefully instead of looking neglected.
The decisions that make mango wood age well
If I were choosing or restoring a piece today, I would focus on three things: how natural I want the surface to look, how hard the furniture will be worked, and how easy the finish will be to refresh later. Mango wood is a good material for that kind of thinking because it already has visual personality. The best treatment is usually the one that respects that personality instead of hiding it.
For sustainable interiors, that also matters on a practical level. A finish that can be repaired, renewed, or gently cleaned is often better than a glossy coating that looks perfect for six months and then becomes awkward to live with. If the piece will be part of everyday life, I would choose the surface you can actually maintain, not the one that only looks good on day one.
In the end, the most successful mango wood pieces are the ones that balance character, protection, and honest upkeep. If those three are in place, the surface will do exactly what it should: look good, feel right, and stay useful for years.