Good chair design is a mix of structure, comfort, and material choice, and the details matter far more than most people expect. When I approach chair building, I start with the load path, then work back to the timber, joinery, and finish. That order saves time, prevents wobble, and leads to a piece that feels solid rather than merely assembled.
The decisions that make the biggest difference
- Start with the chair’s job: dining, desk, lounge, or occasional seating each needs a different geometry.
- For a typical dining chair, seat height usually works best around 43-48 cm, with roughly 24-30 cm between the seat and the tabletop.
- FSC- or PEFC-certified timber, reclaimed stock, and low-VOC finishes are the easiest sustainable choices.
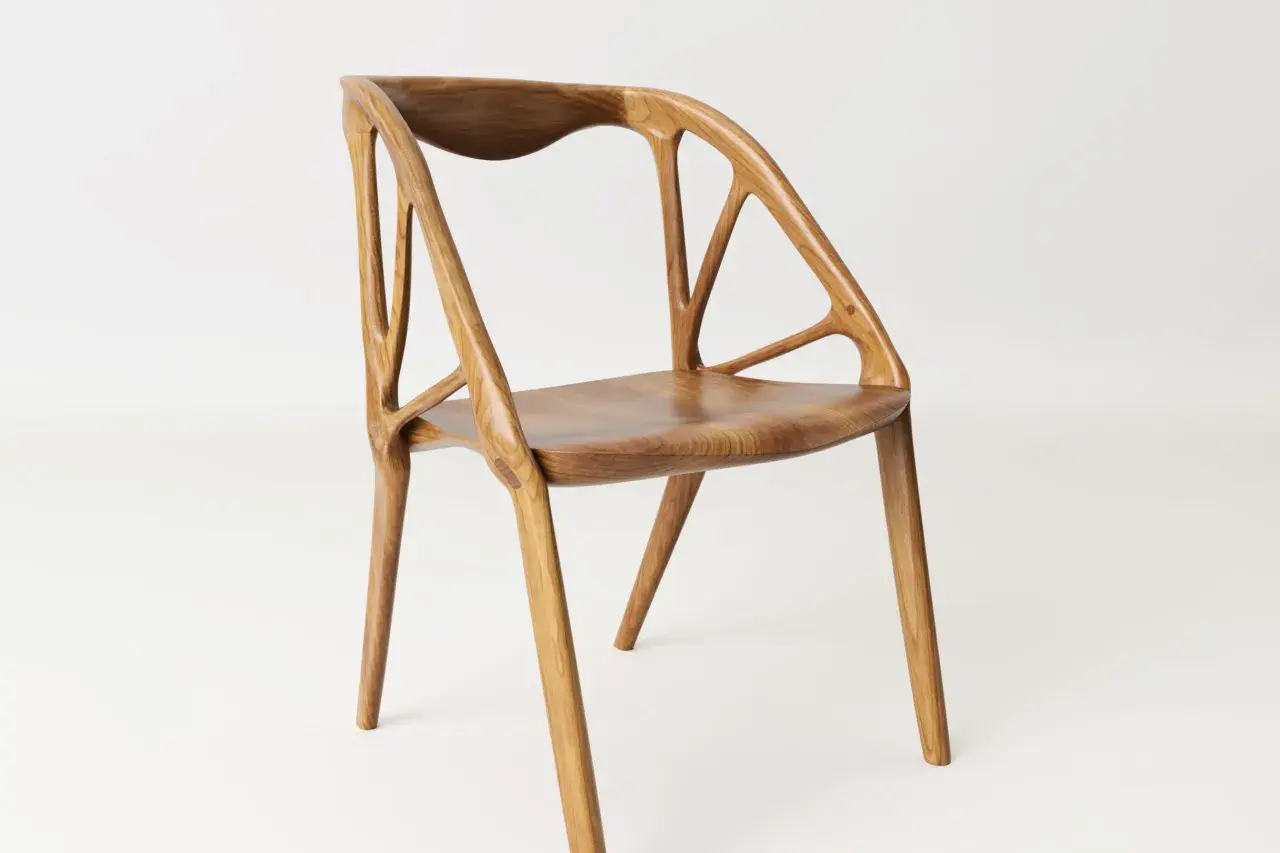
- Mortise-and-tenon joinery remains the most dependable option for the main frame, especially where legs meet rails.
- A chair only feels good if it is stable, easy to repair, and sized for the people who will actually use it.
Start with the chair’s job, not the timber
I always begin by asking how the chair will be used, because the answer changes almost everything. A dining chair needs compact proportions, a more upright back, and enough clearance to slide under a table; a lounge chair can sit lower and recline more; a desk chair needs a posture that holds up for longer sessions. The design dictates the material, not the other way around.
For a typical dining chair, I usually aim for a seat height of 43-48 cm and a seat-to-table gap of 24-30 cm. Seat width in the 42-48 cm range is comfortable for most adults, while a seat depth of about 40-43 cm avoids pressure behind the knees. If you add upholstery, remember that foam compresses; a thick cushion can quietly steal 10-20 mm of clearance and make a good chair feel awkward.
That is why I like to sketch the geometry first and only then decide whether the frame should be solid wood, plywood, or metal. Once the proportions make sense, the rest of the build becomes much more predictable.
Choose materials that support the structure and the planet
The most sustainable chair is usually the one that lasts long enough to be repaired, refinished, and reused. I look for materials with a clear supply trail, sensible weight, and enough strength for repeated racking loads. FSC- or PEFC-certified timber is the simplest sourcing check when I want a responsible wood option, and reclaimed stock can be even better if it is dry, straight, and free from hidden damage.
| Material | What it does well | Trade-off | Best use |
|---|---|---|---|
| Solid hardwood | Strong, repairable, and visually warm | Can move with humidity if it is poorly dried | Frame chairs, dining chairs, heirloom pieces |
| Birch plywood | Stable, efficient, and good for shaped parts | Edges need finishing and exposed layers need care | Seats, shells, backs, modern lightweight designs |
| Powder-coated steel | Thin profiles and high strength | Repairs are more specialised if it dents or corrodes | Minimal frames, contract-style seating, mixed-material chairs |
| Bamboo | Fast-growing and attractive when laminated well | Needs careful engineering to avoid weak nodes and splits | Light frames, decorative parts, sustainable statement pieces |
| Cane or rattan | Light, breathable, and low-impact | Not suitable as the main load-bearing structure | Seat panels, backs, decorative infill |
| Reclaimed timber | Low embodied impact and strong character | May need extra sorting, milling, and metal detection | Small runs, bespoke chairs, repair-led projects |
A frame that is too soft, too heavy, or too dependent on surface screws rarely ages well. The sweet spot is a material that can carry load at the joints, not just look good in the room.
Get the proportions right before you cut wood
Dimensions are not decoration; they decide whether the chair feels composed or awkward. I like to set the numbers early, because every later cut depends on them. A chair that is 10 mm off in the wrong place can still look fine in a photograph and feel wrong the second someone sits down.
| Part | Practical range | Why it matters |
|---|---|---|
| Seat height | 43-48 cm | Keeps the chair usable with a standard dining table |
| Seat depth | 40-43 cm | Supports the thighs without cutting into the back of the knees |
| Seat width | 42-48 cm | Gives enough room without making the chair bulky |
| Seat to table gap | 24-30 cm | Leaves enough clearance for legs and plates |
| Backrest angle | 100-105 degrees from the seat | Offers support without forcing a slouch |
If the chair will use loose cushions, I subtract the compressed thickness of the cushion rather than the uncompressed height. That one habit prevents more bad surprises than any other sizing rule I know. Once the numbers work on paper, the joinery has a fair chance of fitting the body and the room.
Build the frame around joints that can take a sideways shove
Chairs fail less from vertical weight than from racking, which is the side-to-side twisting that happens when someone sits down heavily or leans back. That is why the primary joints need to resist movement, not just hold pieces together in a calm workshop setting. This is the point where a chair stops being a simple furniture project and starts becoming a structural one.
Mortise and tenon for the main load path
For the legs, rails, and stretchers, I trust mortise-and-tenon joinery first. It gives long-grain glue area, good mechanical lock, and real resistance to wobble. A well-cut tenon should fit cleanly without crushing fibres; sloppy fits tend to creep over time, especially on chairs that get daily use.
Dowels when the design needs a lighter touch
Dowels can work well in smaller chairs or in parts that are not carrying the heaviest load, but they demand accurate drilling and good alignment. I use them when the layout is disciplined and the stock is stable. If the chair relies on dowels in the main joints, I want the hole pattern to be exact and the grain direction to be predictable.
Read Also: Rustic Wood Furniture - Your Guide to Choosing & Caring
Screws only where they make sense
Mechanical fasteners are useful for seats, upholstery layers, temporary assembly, and some knock-down designs. They are not a substitute for proper structural joinery in the frame. If the design must come apart, threaded inserts and machine screws are cleaner than driving wood screws into end grain and hoping for the best.
As a rule, I avoid any chair where the main load-bearing corners depend on a weak butt joint and a bit of glue. It might stand up on day one, but it is rarely the chair you want after a few seasons of real use.
Assemble in the sequence that keeps the frame square
The order of assembly matters because chair parts tend to pull each other out of alignment if you rush them. I dry-fit every major component before glue touches anything, then I check that the frame sits flat and the diagonals match. On a small chair, I like to see the diagonals within 1-2 mm of each other before final glue-up.
- Mill every part to final thickness and width before cutting joinery.
- Cut the mortises, tenons, dowel holes, or slots while the stock is still square and easy to reference.
- Shape the seat, back, and edges before final assembly if the design allows it.
- Dry-fit the full frame, clamp it lightly, and check for twist, skew, and leg length.
- Glue in subassemblies first if the chair is complex, then bring the full frame together in one controlled session.
- Leave the chair clamped long enough for the adhesive to reach real strength, then re-check the feet on a flat surface.
That sequence reduces panic. It also makes it easier to spot a problem while it is still a problem you can fix, not a problem hidden under cured glue.
Finish for daily use and easier repair
Finishing is not just about colour. It affects grip, cleaning, moisture resistance, and how easily the chair can be restored later. For a sustainable build, I prefer finishes that can be renewed without stripping the whole piece back to bare wood every time.
For most indoor chairs, a hardwax oil gives a natural feel and is easy to touch up. A water-based varnish or lacquer is tougher if the chair will face heavier daily use, though it creates a more sealed surface. Shellac can be useful for a lighter touch, but I would not choose it for high-risk moisture exposure. Whatever finish I use, I soften the sharp edges first; a radius of about 1-2 mm on corners makes a chair more pleasant to handle and less vulnerable to wear.
If the chair includes upholstery, I finish the frame before fabric goes on. That keeps future maintenance simple and reduces the risk of staining or damaging the textile during later repairs.
The details I never skip on a chair that gets daily use
When I am deciding whether a chair is genuinely finished, I check a few things that have nothing to do with style and everything to do with longevity. The chair should sit flat without rocking, the back should flex slightly without creaking, and the feet should not mark the floor or absorb moisture. If it is a dining chair, I also test it with the table it is meant to live with, because a perfect chair can still fail the moment it meets the wrong table height.
- The frame stays square after a full day of clamping and curing.
- The chair does not twist when weight shifts to one side.
- All edges that touch hands, knees, or fabric are eased, not left sharp.
- Any removable seat, cushion, or cane panel can be replaced without rebuilding the whole chair.
- The material choice matches the use case, not just the mood board.
If I had to reduce the whole process to one rule, it would be this: build for load, then comfort, then appearance. That sequence produces chairs that fit the room, survive daily use, and align with a more sustainable approach to furniture.