A drinks trolley works best when it behaves like a small piece of furniture, not a jumble of bottles. The first thing I look for when deciding how to style a bar cart is whether it suits the room: slim enough for a UK living room, sturdy enough to move when needed, and finished in a material that echoes the rest of the decor. Once that base is right, the rest becomes far easier to edit.
A calm drinks trolley usually looks best when the useful pieces do most of the visual work
- Keep the cart focused on one clear job: serving, storage, or a mix of both.
- Limit the visible items to a few bottles, the right glassware, and one or two decorative accents.
- Use shelves with a purpose, so the setup stays easy to restock and easy to clean.
- Choose one design direction and repeat it through the finish, glassware, and accessories.
- Swap seasonal touches rather than rebuilding the whole cart every few weeks.
Choose the right base and where it lives in the room
Styling starts before you place a single bottle on the shelf. I prefer a cart with at least two tiers, a solid frame, and a lip or rail so everything feels secure when it moves. In a smaller flat, a slim trolley around 45 to 60 cm wide is usually easier to live with than a bulkier cabinet, especially if the cart will sit near a sofa, dining chair, or hallway opening.
Placement matters just as much as the cart itself. I try to keep it out of the main traffic path and leave around 80 cm of clear space where possible so people are not brushing past bottles and glassware. If the cart is going to stay in one spot, treat it more like a styled sideboard: a mirror, framed print, or lamp nearby can give it a visual home and stop it from looking lost.
Material choice also changes the mood. Brass and glass feel lighter and more polished, wood reads warmer and more relaxed, and rattan or cane softens the whole setup. If the room already has a strong material story, I usually echo that first rather than forcing a new finish into the mix. With the base in place, the styling decisions become much easier to control.
How to style a bar cart without making it look busy
I keep the formula simple: give every visible item a job. A good cart usually works with three functional groups and one soft decorative layer, which keeps it looking edited instead of overfilled. If the surface is already crowded before you add glassware, you have too much on it.
The easiest starting point is this:
- Two to three bottles you actually pour often.
- One mixer or carafe, such as tonic, soda water, or a pre-batched cocktail.
- Four to six glasses grouped by type instead of scattered individually.
- One tool set with the basics, such as a shaker, jigger, spoon, and opener.
- One natural element, such as a small vase of flowers, herbs, citrus, or a bowl.
I also like to keep at least one alcohol-free option visible. It makes the cart more useful for guests and stops the setup from feeling like it only works for one kind of evening. A single bottle of sparkling water, a nice tonic, or a non-alcoholic aperitif can do more for hospitality than another decorative object ever will. Once the cart has a clean visual rhythm, the next step is making sure each shelf earns its place.
Organise the shelves for everyday use
The most practical carts are arranged from the top down. The upper shelf should hold the items you reach for most often, the middle shelf should support service, and the lower shelf can carry the heavier or less attractive pieces. That keeps the display looking polished without making you move three things every time you want a drink.
| Shelf | What I put there | Why it works |
|---|---|---|
| Top shelf | Current spirits, mixer bottles, garnish bowl, and the main tools | It is the most visible and the easiest to reach when serving |
| Middle shelf | Glassware, napkins, a small tray, and a carafe or ice bucket | Keeps the visual weight balanced without overcrowding the top |
| Bottom shelf | Backup bottles, extra coasters, larger serving pieces, or a stack of books | Hides bulkier items while keeping them close at hand |
If your cart only has two shelves, make the top one the service zone and the lower one the storage zone. I rarely leave more than five visible categories on a small cart because anything beyond that starts to read as clutter. A tray is often the best organising tool here: it corrals smaller objects, protects the surface, and makes the whole arrangement feel intentional. Once the shelves are working logically, you can start deciding what kind of mood the cart should carry.
Pick a look that suits the room
A drinks trolley should feel like it belongs to the room, not like it was borrowed for a party. The easiest way to get there is to choose one style direction and repeat it through the bottles, glassware, and accessories. I find that this matters more than collecting expensive pieces; a modest cart with a clear point of view almost always looks better than a costly one with mixed signals.
| Style direction | Best materials | What to display | Where it works well |
|---|---|---|---|
| Pared-back modern | Chrome, black metal, clear glass | Simple glassware, one vase, a neat tray, a couple of bottles | Minimal rooms, smaller flats, calm contemporary schemes |
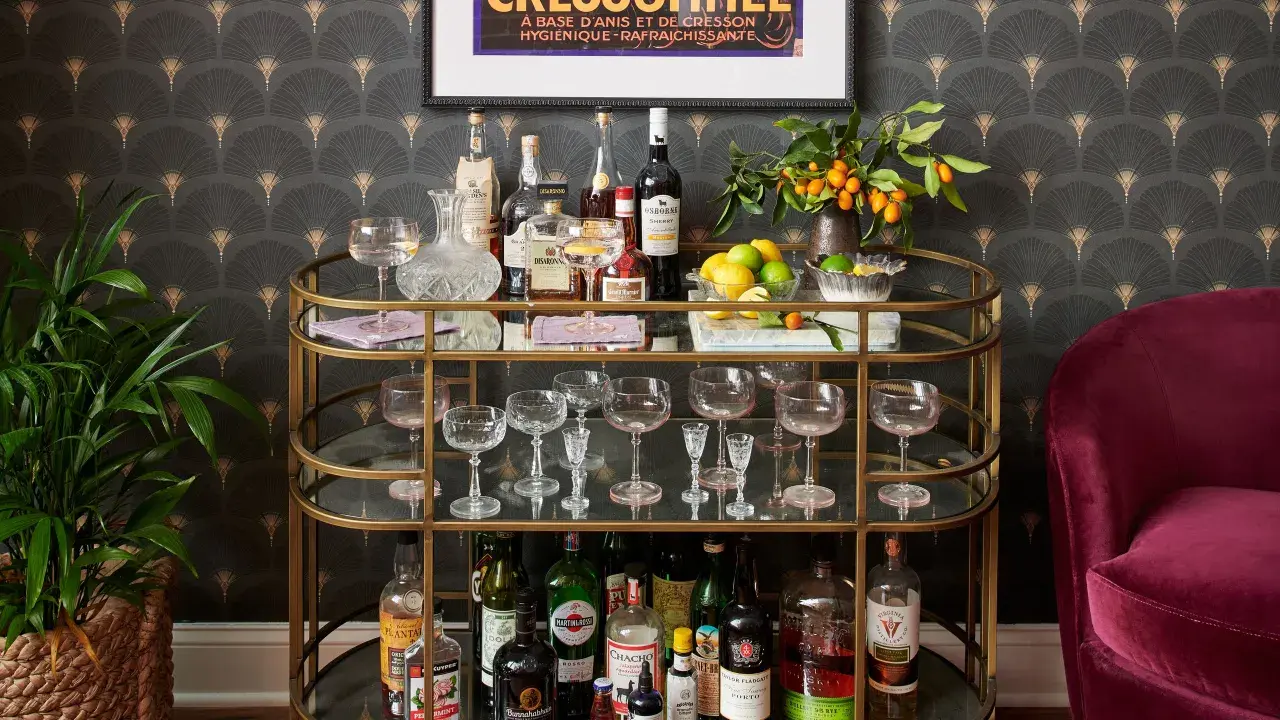
| Warm vintage | Brass, wood, smoked glass, cane | Decanters, coupe glasses, a stacked book or two, a small bowl | Collected interiors, period homes, richer colour palettes |
| Soft seasonal | Painted metal, rattan, linen, recycled glass | Herbs, citrus, candles, interchangeable napkins, lighter glassware | Homes where the cart changes with the season or the occasion |
When I am undecided, I start with the room’s existing finish and echo that once, then add contrast through texture instead of more colour. For example, a room with oak and linen can handle amber glass and a woven tray, while a room with marble and chrome usually looks sharper with clear glass and a simple metallic accent. That kind of restraint is what keeps the cart from drifting into decorative noise.
Add texture and sustainable detail
This is the part that makes the cart feel lived in rather than staged. Because Mobiliariolozano.net leans towards thoughtful, sustainable home design, I would always rather see a few durable, reusable pieces than a cart full of disposable party extras. A vintage tray, second-hand glassware, linen napkins, or a ceramic bowl for citrus adds character and usually lasts far longer than trend-led accessories.
I also like using things that can move between jobs. A small bowl can hold limes during a gathering and keys or tea lights during the week. Fresh herbs from the kitchen can act as garnish and greenery at the same time. Refillable bottles, stainless steel cocktail picks, and reusable straws are small choices, but they reduce clutter over time because you are not constantly replacing them.
The key is to use texture rather than quantity. One woven element, one glass element, and one natural element are often enough to soften the hard edges of a metal cart. If the arrangement still feels flat, I would add height with a stemmed vase or a tall bottle before I would add another decorative object. That balance becomes even more important once you start editing for the common mistakes that can undo the whole look.
Avoid the mistakes that make a cart feel cluttered
Most bar carts do not fail because they are unattractive; they fail because they are overworked. I see the same problems again and again, and they are all easy to fix once you notice them.
- Too many bottles on display make the cart look like stock storage. Keep only the ones you use regularly visible.
- Everything at the same height flattens the arrangement. Mix tall bottles with a lower bowl, tray, or stack of books.
- Decor that blocks access gets in the way of service. If it has to be moved every time you pour a drink, it belongs elsewhere.
- Mixed metals without a plan can feel accidental. Two finishes are usually enough if one is dominant and the other is a small accent.
- No negative space makes the cart feel heavy. Leave a little breathing room so the eye can rest.
- Forgetting upkeep is the quickest way to lose the look. Fingerprints, dust, and drips show faster on glass and brass than many people expect.
My simplest rule is this: every time you add something, remove something else if the cart starts to feel tight. That single habit keeps the setup usable, and it keeps the styling looking deliberate rather than collected by accident. From there, the final step is to keep a few small extras nearby so the cart is ready whenever you need it.
The small extras I keep ready for the next guest
A well-styled cart should do more than look good for ten minutes after you arrange it. I like to keep a few practical items nearby so the cart can be reset quickly after a dinner, a quiet drink, or a bigger gathering.
- One spare ice tray or a small insulated ice bucket.
- A bottle of sparkling water and a non-alcoholic option.
- Extra cocktail napkins or linen serviettes.
- Coasters that match the room, not just the occasion.
- A clean cloth for glass marks and spills.
- A citrus bowl, a bottle opener, and a corkscrew.
- One candle or small lamp if the cart sits in a dim corner.
I aim to reset a cart in under five minutes. If it takes longer than that, there is usually too much on it. The best version is the one that can handle an ordinary Tuesday as easily as a Saturday night, because that is where style stops being decoration and starts becoming part of how the room works.