Knowing how to organize kitchen drawers saves time every single day, because the right layout removes friction from cooking, serving, and clearing up. I approach it as a workflow problem first and a storage problem second: what you reach for most often should sit where your hands naturally go, and the drawer itself should be easy to clean and refill. In a well-run kitchen, even a small drawer can feel generous when it holds the right things in the right place.
The quickest route to calmer drawers
- Empty one drawer at a time and group items by task, not by random object type.
- Place everyday cutlery, prep tools, and cooking utensils near the zones where you actually use them.
- Measure first, then choose modular inserts that suit the drawer depth and internal width.
- Prefer bamboo, FSC-certified wood, or recycled plastic if you want a durable, lower-waste solution.
- Keep the layout simple enough to reset in under two minutes after unloading the dishwasher.
Start with the way you cook, not the drawer itself
I always begin by emptying one drawer and sorting everything into real-life groups. The most useful split is usually not “utensils” and “miscellaneous”, but “what I use every day”, “what I use weekly”, and “what should not be in a kitchen drawer at all”. That usually means a quick purge of dead batteries, takeaway menus, twist ties, old receipts, and duplicate gadgets that seemed useful once.
A simple three-box system works well here: keep, relocate, and let go. The keep pile should stay small enough that each item earns its place, because prime drawer space is too valuable for tools you reach for twice a year. If you cook often, the goal is not perfect symmetry, it is reducing the number of decisions between opening the drawer and actually using the thing inside it.
Once the jobs are clear, the next step is matching those jobs to the right drawer locations, because that is what makes the system feel effortless rather than decorative.
Map drawers by workflow before you buy inserts
The cleanest drawer plans follow movement through the kitchen. I like to think in zones, so the drawer near the dishwasher handles unloading, the drawer near the hob handles cooking, and the drawer near the prep area handles chopping and measuring. That way, the layout supports the way the kitchen is used instead of fighting it.
| Drawer zone | Best for | Why it works |
|---|---|---|
| Near the dishwasher | Everyday cutlery, tea towels, serving spoons | Makes unloading faster and keeps the most used items within easy reach |
| Near the prep area | Measuring spoons, peelers, thermometers, scissors | Reduces back-and-forth while you are chopping or mixing |
| Near the hob | Spatulas, tongs, wooden spoons, ladles | Lets you grab tools without stepping away from the pan |
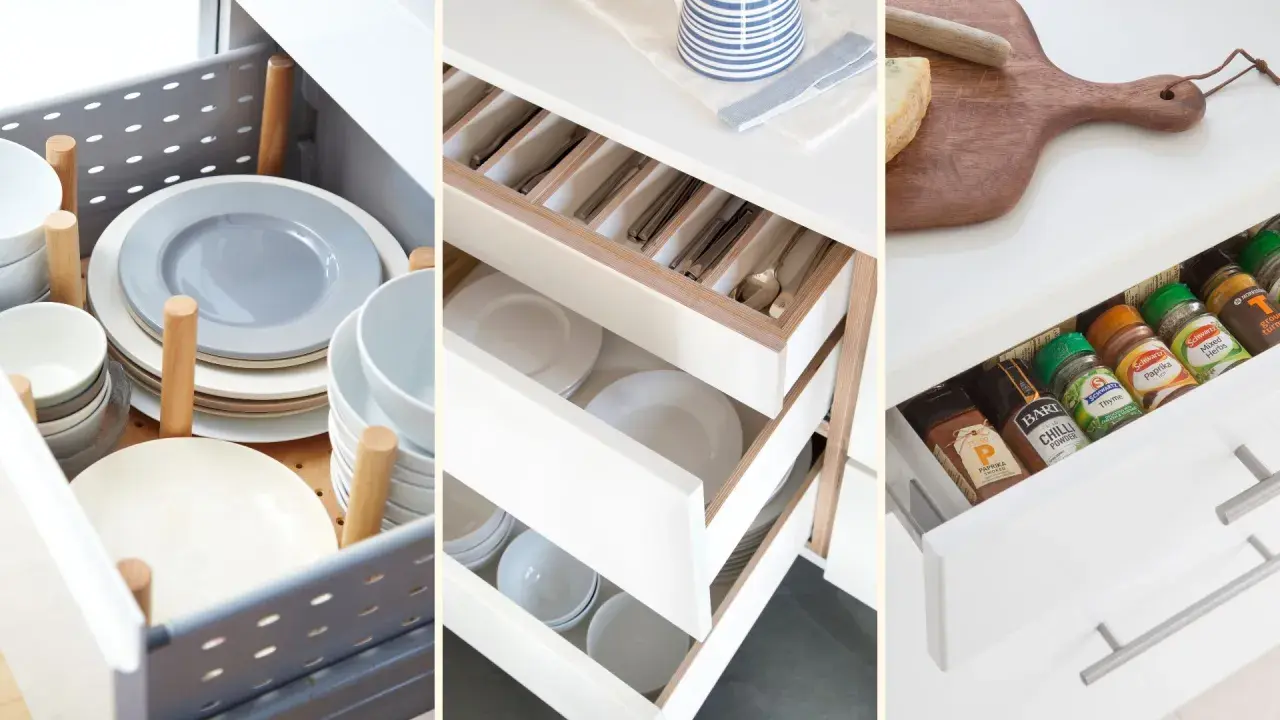
| Deep lower drawer | Lids, boards, pans, bulkier tools | Uses vertical depth better than a shallow tray ever could |
A standard 60 cm base drawer does not need to be packed wall to wall. A 32 cm tray plus a knife rack or a small open zone is often more useful than forcing one oversized insert into every inch. I also like leaving a little breathing room, because a drawer that can tolerate change is much easier to live with than one that only works when nothing moves.
With the zones mapped, the organiser itself becomes much easier to choose.
Choose organisers that fit the drawer and the planet
For most kitchens, I prefer modular organisers over fixed trays. They adapt better to irregular drawer sizes, survive moves more gracefully, and can be reconfigured when your habits change. That matters in a real home, because the drawer that holds your cutlery this month may need to hold baking tools, napkins, or serving pieces later.
| Organiser type | Best use | Typical budget | What to watch |
|---|---|---|---|
| Cutlery tray | Forks, spoons, knives | £8-£15 | Simple and clean, but it can waste space in awkward drawers |
| Expandable divider | Mixed utensils, tea towels, wraps | £20-£35 | Useful for odd widths, though it needs a snug fit |
| Knife insert or block | Knives | £15-£30 | Keeps blades protected, but it takes dedicated space |
| Deep-drawer peg system | Plates, bowls, lids | £30-£60+ | Excellent for vertical storage, but more expensive than a basic tray |
When I want a lower-waste option, I look first at bamboo, recycled plastic, or certified wood, but durability matters just as much as material. A tray that cracks, warps, or becomes impossible to clean is not sustainable in practice, even if it looked eco-friendly in the shop. The greener choice is usually the one you will keep for years because it fits, cleans easily, and can move with you if the kitchen changes.
After that, the real work is assigning each category a home inside the drawer.
Build each drawer around one job
Cutlery and everyday eating tools
Keep forks, knives, dessert spoons, and teaspoons separated, then place the items you use most at the front or in the easiest-handled section. If children help set the table, I would put their cutlery in a low-friction slot rather than burying it behind serving spoons. The point is speed, not perfection.
Cooking tools and prep utensils
Put spatulas, tongs, ladles, peelers, and whisks together, ideally in the drawer closest to the hob or prep surface. Longer tools often work best when they lie diagonally or sit in a divided channel, because that shape prevents handles from tangling. If you own a lot of single-purpose gadgets, this is where discipline pays off, since only the ones you actually use should stay in prime space.
Wraps, bags, and small consumables
Foil, parchment, cling film, food bags, and clips are easiest to manage when they are grouped by format, not by brand. I like upright dividers for rolls and flat boxes, because they stop packets slumping into one another. If a drawer starts collecting loose elastic bands, candle stubs, and spare labels, it is usually a sign that the category is too broad.
Deep drawers for lids, boards, and heavier items
Deep drawers work best when items stand upright instead of being stacked into a wobbling tower. Lids, chopping boards, and trays can be filed vertically with dividers or pegs, which makes them easier to lift out and return. That approach uses height properly and avoids the familiar problem of unstacking three things just to reach the one at the bottom.
A layout only works if it survives normal use, which is where maintenance habits matter.
Keep the system easy enough to maintain on a busy week
Most messy drawers do not fail because the original idea was bad. They fail because the system was too complicated to keep using. If a drawer needs five minutes of re-sorting every time you make tea, it will drift back into chaos sooner than you expect.
- Reset the drawer when you unload the dishwasher so stray items go back immediately.
- Use one drawer as a strict category drawer, with no “temporary” items allowed.
- Remove duplicates whenever you notice them, especially with peelers, spatulas, and measuring spoons.
- Wipe the inserts weekly so crumbs do not turn into glue.
- Revisit the layout after holidays, baking projects, or a big shop, when the contents usually shift.
Read Also: Bar Stool vs Counter Stool - Choose the Right Height
Common mistakes I would avoid
- Buying the organiser before measuring the drawer interior.
- Using too many small compartments and creating dead space.
- Mixing daily utensils with rarely used gadgets.
- Choosing a tray that looks neat but cannot be lifted out for cleaning.
When those habits are in place, the last step is deciding on a setup that works in a real UK kitchen, not just in a styled photo.
The setup I would use in a small British kitchen
If I were starting from scratch, I would keep the plan deliberately simple. One shallow cutlery drawer near the dishwasher, one prep drawer for measuring tools and peelers, one cooking-tool drawer near the hob, one wrap drawer with upright dividers, and one deep drawer for lids or boards would cover most daily needs. That covers the essentials without over-engineering the space.
- Use a shallow cutlery tray for the things you touch every day.
- Reserve a prep drawer for measuring spoons, thermometers, and small tools.
- Keep long-handled cooking utensils close to the hob.
- Group wraps, bags, and clips together so they do not spread through the kitchen.
- Let deep drawers handle bulky items that are awkward to stack.
If I had only one rule for the whole kitchen, it would be this: buy fewer, better organisers and give each drawer one clear job. A drawer system that can be cleaned, adjusted, and reused will always outlast a prettier one that only works on day one, and that is the version I would choose for a sustainable home.