Getting cushion measurements right saves time, money, and a lot of awkward returns. It also makes a real difference to how a room feels, because a cushion that fits properly looks calmer, fuller, and more intentional. In this guide, I’ll show you how to measure cushion size correctly, how different shapes should be checked, and how to choose an insert that suits the finish you want.
The key measurements that matter most
- Measure the cover flat, seam to seam, rather than trusting a compressed cushion inner.
- Use centimetres for UK projects, and keep the same unit throughout the job.
- Square and rectangular cushions need length, width, and often depth; round cushions are measured by diameter.
- A slightly larger insert usually gives a fuller look, but the exact oversize depends on the filling.
- Piped edges, curved fronts, and worn cushion inners can hide errors, so I always measure twice.
Start with the cover, not the flattened cushion
The biggest mistake I see is measuring a cushion after it has been sat on, squeezed, or misshapen by use. That gives you a distorted size and almost always leads to the wrong replacement. If you still have the cover, lay it flat on a firm surface and measure the cover itself. That gives you the finished dimension you actually need.
I prefer to use a tape measure for soft shapes and a ruler or rigid tape for straighter edges. Keep the cover smooth, but do not stretch it. Stretching can add a centimetre or two you will regret later. For UK work, I write everything down in centimetres first, then convert only if I need to compare sizes with an imported insert or a retail listing.
This approach matters even more for sustainable home furnishing. Measuring the finished cover properly means you can replace only the part that needs replacing, instead of discarding a decent cushion because the insert or inner was guessed. Once that basic habit is in place, the actual measuring process becomes much easier.
Measure square and rectangular cushions the same way every time
For most sofa, seat, and scatter cushions, the method is simple and repeatable. I measure seam to seam, not across the softest bulge, because the seam gives me the true finished edge. If the cushion has piping, I measure between the piping rather than outside it. That keeps the size consistent and prevents a cover from coming out too loose.
- Remove the inner if there is one, then lay the cover flat on a table or floor.
- Smooth it gently so the seams sit naturally, but do not pull the fabric tight.
- Measure the length from left seam to right seam.
- Measure the width from top seam to bottom seam.
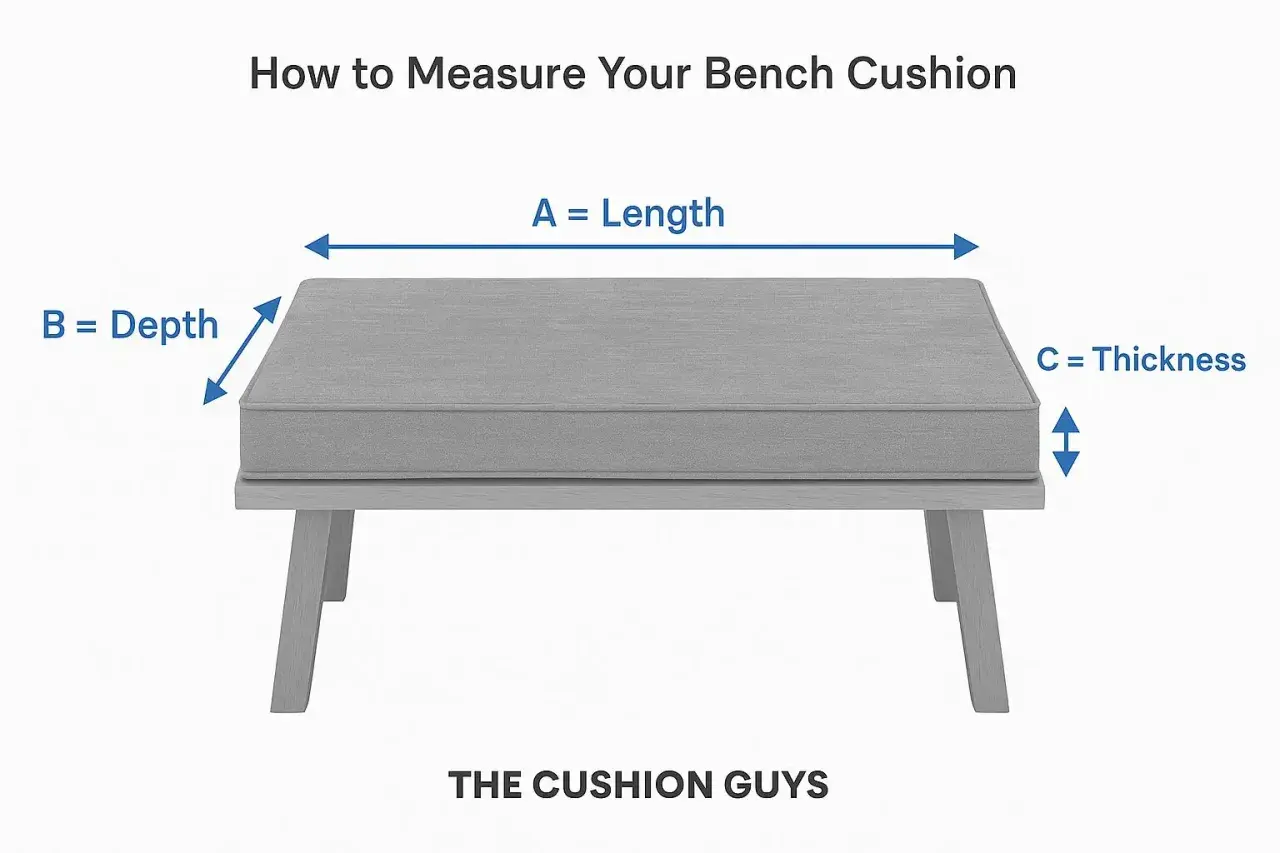
- If it is a box cushion, measure the depth from the front seam to the back seam.
That third dimension is the one people forget most often. A cushion can look square from above but still need a very different depth once the sides are taken into account. For seat cushions and firmer foam replacements, depth matters as much as length and width because it affects support, not just appearance.
If the cover is slightly uneven, I measure the widest sensible point and note the shape in writing. A good order sheet is not just numbers; it is a small description of how the cushion sits when it is in use. That becomes useful when I move on to round and irregular shapes, which need a different approach.
Get round, bolster, and shaped cushions right
Not every cushion is a square pad with tidy corners. Round cushions, bolsters, and awkward corner pieces need a different measuring logic, and if you force them into a square-only method, the result will be wrong.
| Shape | What I measure | Practical note |
|---|---|---|
| Square or rectangular | Length, width, and depth | Measure seam to seam or between piping. |
| Round | Diameter | Measure straight across the widest point through the centre. |
| Bolster | Length and diameter | Check both ends if the tube tapers. |
| Curved or corner cushion | Widest points plus depth | Sketch the outline first if the shape is irregular. |
Round cushions
A round cushion is measured by diameter, which is the straight line across the centre from one edge to the other. I do not measure around the curve because that gives you the circumference, which is not the figure most cushion makers want. If the cushion is noticeably domed, I still use the flat finished width as the main reference and then note the loft separately.
Bolsters and cylinders
Bolsters need two measurements: length and diameter. A long bolster that tapers at the ends should be measured at the widest section, then checked again near the end so you know whether it is truly cylindrical or slightly shaped. That distinction matters if you are ordering a replacement inner or a made-to-measure cover.
Read Also: Wash Polyester Fibre Fill - Stop Clumping & Restore Fluff!
Irregular shapes
For corner sofas, window seats, and cushions with cut-outs, I trace the outline on paper first. It sounds old-fashioned, but it is one of the fastest ways to avoid guessing. A flat sketch also helps if the cushion is asymmetric, because then you can mark the longest side, the deepest point, and any angled corners separately. In practice, that is far safer than trying to hold an awkward cushion in the air with a tape measure and hope for the best.
Choose the insert size that gives the right finish
Once you know the finished cover size, the next decision is the insert. This is where the look changes most. A cover and insert that are exactly the same size often looks flat, especially on decorative cushions. A slightly larger insert usually fills the corners better and gives the cushion a more tailored shape.
For many decorative cushions, I treat 1 to 2 inches larger than the cover as the working rule, which is roughly 2.5 to 5 cm. In the UK, that often means a 45 x 45 cm cover works well with a 50 x 50 cm insert. That said, the fill material changes the result. Feather and hollowfibre inserts compress differently, so they can usually tolerate more oversizing than a firm foam inner.
| Fill type | Size approach | What it does |
|---|---|---|
| Feather or down | Slightly larger than the cover | Creates a soft, plump look and is easy to shape by hand. |
| Polyester hollowfibre | Usually one size up | Gives a neat everyday finish and keeps its shape well. |
| Foam | Closer to the finished cover size | Supports seat cushions and keeps a firmer profile. |
| Memory or high-density foam | Measured very precisely | Works best where support and structure matter more than softness. |
I’m more cautious with lumbar cushions. They often look best when the insert is the same size as the cover or only slightly larger, because too much filling can bow the shape and make the cushion feel awkward against the lower back. The same is true for very tailored box cushions: if the insert is oversized without checking the construction, the edges can distort and the corners stop sitting cleanly.
If you are trying to balance comfort, appearance, and material use, this is the point where a small sizing decision has a surprisingly large effect. A cushion that fits the insert properly lasts longer, looks better, and is less likely to end up replaced too soon.
Avoid the errors that make cushions look wrong
Most bad cushion fits come from a handful of predictable mistakes. Once you know them, they are easy to avoid.
- Measuring a compressed inner - old cushion fillings flatten with use, so they are not a reliable guide.
- Ignoring piping - if the cushion has piping, measure between the piping so you capture the real finished panel size.
- Mixing units - if you start in centimetres, stay in centimetres until the end.
- Rounding too early - keep decimal points until the final note, especially on made-to-measure pieces.
- Assuming every fill behaves the same - feather, fibre, and foam all change the final shape in different ways.
- Forgetting seam allowance when sewing - the cut fabric needs extra room, but the finished cushion size does not.
If I am making a new cover, I write two figures on the order sheet: the finished size and the cut size. That simple habit stops a lot of confusion later on. It also helps if someone else is sewing from the notes, because they can see immediately whether the measurement is for the visible cushion or the fabric pieces before construction.
For awkward projects, I also recommend a quick test. Cut paper or inexpensive calico to the intended finished size and wrap it around the inner or frame. It is a low-cost check that often reveals whether the cushion will sit too tight, too loose, or just right.
The size check I use before I order or sew
Before I place an order, I check three things: the finished cover size, the fill material, and the look I want once the cushion is on the sofa, bench, or chair. That final step is small, but it prevents the most common disappointment, which is choosing a technically correct size that still looks wrong in the room.
- Confirm the finished dimensions in centimetres.
- Decide whether you want a tailored, relaxed, or deliberately full look.
- Match the insert to the cushion’s job, not just its shape.
- Recheck any piping, curves, or asymmetry before you commit.
When the measurements are accurate, you use less material, avoid unnecessary replacements, and get a cleaner result the first time. That is usually the most sustainable choice as well as the most practical one. Measure the cover, respect the shape, choose the fill with intent, and the cushion will do exactly what it should: fit properly and finish the furniture well.