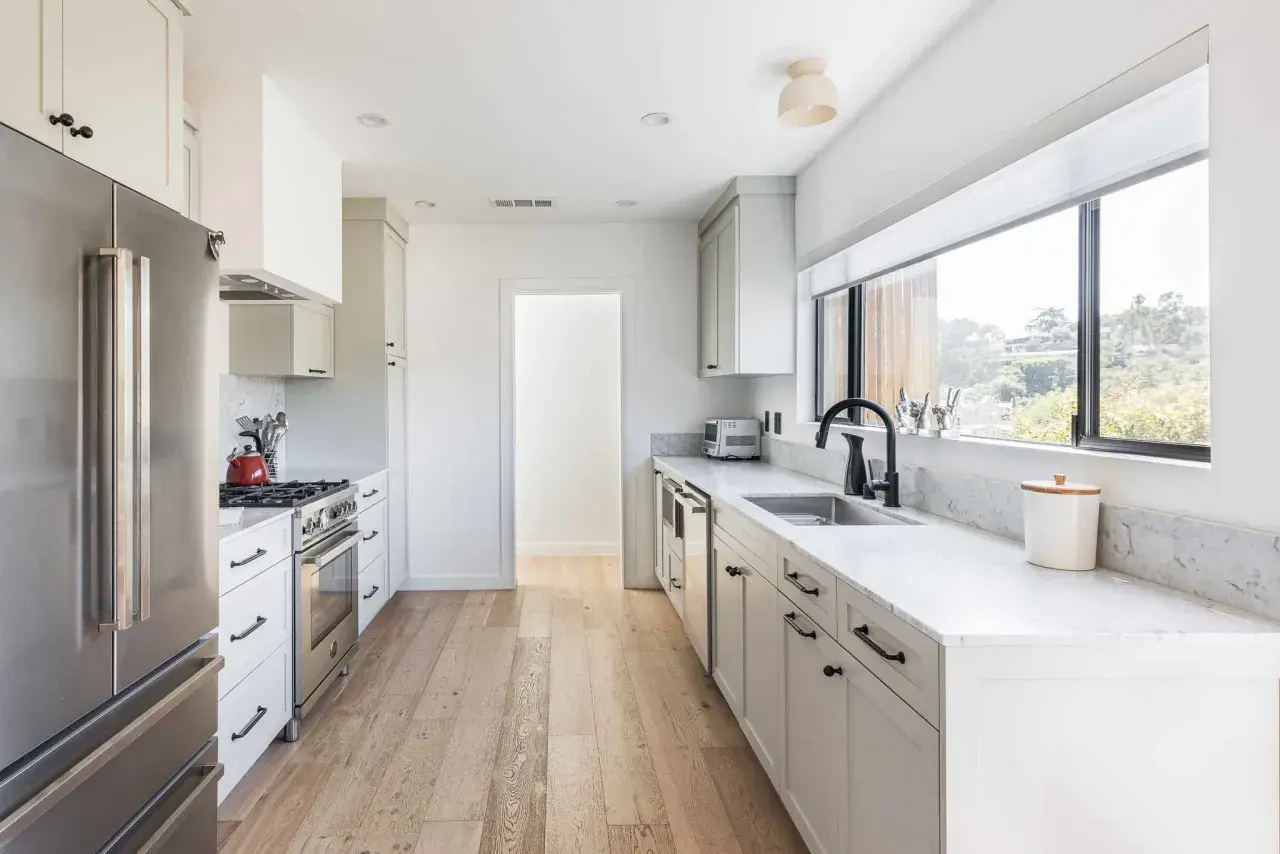
A galley kitchen can be one of the most efficient ways to organise a narrow room, but it only works well when the aisle width, storage depth and lighting are handled with care. In British homes, especially in terraces, flats and older houses, I see this layout used because it gives a compact room real purpose instead of trying to pretend it is larger than it is. This article breaks down how to plan it, what measurements matter, where the common mistakes appear, and which sustainable choices make the biggest difference over time.
Key takeaways for a narrow kitchen that works hard without feeling boxed in
- Plan the aisle first: around 1,000-1,200 mm feels comfortable for most homes, while 900 mm is the tight end of workable.
- Use the two runs for clear zones, not just storage: prepare, cook and clean in a sequence that reduces back-and-forth.
- Drawers, pull-outs and tall end units usually outperform deep cupboards in a compact room.
- Light, reflective finishes help, but I would still favour calm, durable surfaces over anything overly glossy or trendy.
- For a lower-impact project, keep the carcasses if they are sound, choose certified timber or recycled-content materials, and use LED lighting.
Why a two-run layout still works so well
I like this layout because it solves a very common problem: how to make a narrow room feel efficient without wasting valuable floor area. By keeping the main working surfaces on two parallel sides, I can shorten the number of steps between the sink, hob and fridge, while still keeping each task in its own zone. That usually means less congestion, cleaner movement and a kitchen that feels composed rather than cramped.
It also suits the way many UK homes are built. In long, thinner rooms, a central island often looks better on paper than it functions in real life. A two-run plan gives you structure without demanding extra clearance that the room simply may not have. For a solo cook it can feel extremely slick; for a couple cooking together, it can still work well if the aisle is generous enough.
- It makes good use of a long, narrow footprint.
- It keeps appliances and prep surfaces close together.
- It avoids the dead corners and awkward movement that often weaken bigger layouts.
- It can be more budget-friendly because you usually need less cabinetry and less worktop than in a larger scheme.
Once that basic logic is clear, the next step is to measure the room honestly, because the layout only feels elegant when the clearance is right.
The measurements I check before anything else
I always start with the clear aisle between the two runs. That single dimension decides whether the room feels calm or annoying. A narrow kitchen can still be comfortable, but only if drawers open cleanly, doors do not collide and two people are not constantly turning sideways to pass each other.| Clear aisle | What it usually means in practice | Best suited to |
|---|---|---|
| 900 mm | Workable, but tight | One cook, light traffic, careful planning |
| 1,000-1,200 mm | Comfortable for most households | Everyday cooking with decent circulation |
| 1,200-1,500 mm | Noticeably easier to move and open appliances | Two cooks, busy family kitchens, frequent drawer use |
Beyond the aisle, I check three more things: counter depth, landing space and door swing. A standard base unit is usually around 600 mm deep, so if both sides are full-depth, the room width disappears quickly. In tighter spaces, I sometimes reduce one side to shallower storage or open shelving, often around 300-450 mm deep, to preserve breathing room without losing all the function.
- Leave a sensible landing zone beside the fridge, sink and hob so hot pans and groceries have somewhere to go.
- Check that the dishwasher door can open without blocking the passage.
- Make sure the oven and fridge doors will not trap you in the aisle when they are open.
- If the kitchen doubles as a route to another room, treat that traffic as part of the layout rather than an afterthought.
Once the measurements are right, the layout itself becomes much easier to organise around real use, not just cabinet count.
How I place the sink, hob and fridge
I still use the work triangle as a quick sanity check, but in narrow rooms I think in zones first: store, prep, cook and clean. That is usually more practical than obsessing over perfect geometric balance. The sink and dishwasher belong together, the hob needs safe landing space on both sides, and the fridge should sit where the door can open without interrupting the entire room.My default approach is simple. I keep the sink near the dishwasher and bins, because that is the messiest part of the workflow. I place the hob where there is enough counter on at least one side to rest a pan safely. I position the fridge at one end of a run whenever possible, so people can open it without forcing others to detour around them.
- Clean-up side: sink, dishwasher and waste storage grouped together.
- Cooking side: hob, oven and enough landing space to set down food safely.
- Cold storage end: fridge or larder fridge placed where it will not choke the aisle.
- Prep zone: the longest uninterrupted stretch of worktop, ideally where natural light helps the most.
If the room is especially tight, I would rather make one side more specialised than split everything evenly and end up with no clear workflow. That decision often matters more than whether the cabinets look perfectly mirrored.
Storage that keeps the aisle usable
In this kind of room, storage is not about cramming in the maximum number of cupboards. It is about choosing storage that does its job without stealing movement space. I would rather have fewer, better drawers than a wall of awkward cabinets that force the room to feel narrow every time someone opens them.
Drawers usually beat doors in compact kitchens because they let you see and reach everything without kneeling or digging into the back of a cupboard. Pull-out larders are another strong choice, especially at the end of a run, because they use vertical space efficiently. Tall units can work too, but I prefer them at the ends rather than in the centre of the room, where they can make the layout feel boxed in.
- Use deep pan drawers for heavy items, not fixed shelves.
- Choose pull-out organisers for spices, oils and cleaning products.
- Keep upper cabinets shallow if the room already feels compressed.
- Use open shelving sparingly, mainly for items you reach every day.
- Take advantage of the lack of corners by keeping the runs clean and straightforward.
There is also a visual benefit here: when the storage is tidy and consistent, the room reads as longer and calmer. That leads naturally into the finishes, because the way surfaces handle light can change the whole feel of a narrow kitchen.
Light, colour and finishes that make the room feel wider
Light is doing more work in a narrow kitchen than people often realise. If the room has a single window, a dark ceiling, heavy cabinet fronts and a dull floor all at once, the layout can feel more constricted than it really is. I prefer to treat light as a design material in its own right, not just something you switch on at night.
I usually start with under-cabinet lighting, because it removes shadows from the worktop and makes the room easier to use after dark. Then I look at how the cabinet colour, splashback and floor finish interact. A soft off-white, pale oak, warm grey or muted green usually feels calmer than pure bright white, and it tends to age better too. Gloss can help bounce light, but I would use it selectively rather than covering every surface in reflections.
- Keep windows as open as possible and avoid blocking them with bulky wall units.
- Use a continuous floor finish to draw the eye along the length of the room.
- Choose one calm main colour and repeat it rather than mixing too many competing tones.
- Use glass or open shelving only where it truly lightens the room, not as decoration for its own sake.
- Pick warm-white LED lighting if the space feels cold, especially in north-facing rooms.
Once the room feels visually lighter, the design can take another useful step: it can become more sustainable without sacrificing practicality.
Sustainable choices that suit a compact kitchen
This is where a smaller footprint can actually help. A narrow room naturally uses less material than a large one, so I focus on durability, repairability and honest sourcing rather than chasing fashionable green labels. The greenest choice is often the one that lasts longer, needs fewer replacements and avoids unnecessary waste.
If the existing cabinet carcasses are sound, I would seriously consider keeping them and changing the doors, worktop or hardware instead of ripping everything out. That one decision can save a surprising amount of waste. From there, I look for FSC- or PEFC-certified timber, recycled-content boards, low-VOC paints and adhesives, and LED lighting that will not need frequent replacement. If the appliances are being upgraded, I prefer the right size for the household rather than the biggest model available.
- Reuse sound carcasses and refront them instead of replacing everything.
- Choose certified timber or recycled-content boards wherever possible.
- Use low-VOC finishes so the room is healthier from day one.
- Specify long-life hinges, runners and drawer hardware so repairs stay simple.
- Buy appliances to fit real use, not imagined future capacity.
I also like to remind clients that sustainability is not only about materials. A layout that is easy to clean, simple to maintain and comfortable to live with will usually stay in use for longer, which is a genuine environmental win. That question of fit leads straight into the final decision: when should you keep this layout, and when should you stop trying to make it work?
When I would choose a different layout instead
There are times when this arrangement is the right answer, and times when it is a compromise too far. If the room is too tight, too busy or used by several people at once, I would not force the layout just because it is a neat idea on paper. A kitchen that frustrates daily use is never a good trade.
| Situation | What I would do | Why |
|---|---|---|
| Clear aisle around 1,000-1,200 mm | Keep the two-run plan | It usually gives the best balance of flow and storage |
| Room is a main through-route | Consider a single-wall or L-shaped layout | Moving traffic can make a narrow room feel crowded very quickly |
| Two people cook together most days | Prioritise wider circulation or a different layout | Sharing a very tight aisle becomes tiring fast |
| You want seating and social space | Look at a peninsula or a more open plan | A narrow corridor is rarely the best place for casual dining |
| The width drops below about 900 mm | Simplify the plan | At that point the room starts to fight the furniture |
That is the line I use in practice: if the layout supports the room, keep it; if the room is forcing awkward movement, change the layout before you change the furniture. That is why I would choose a galley kitchen when the room is narrow, the traffic pattern is simple and the goal is a calm, efficient workspace rather than a social island. In the right setting, it is not a compromise at all, but one of the smartest and most sustainable ways to design a compact kitchen.